How to Set Up Bikejoring Gear (Without the Antenna Tangle)
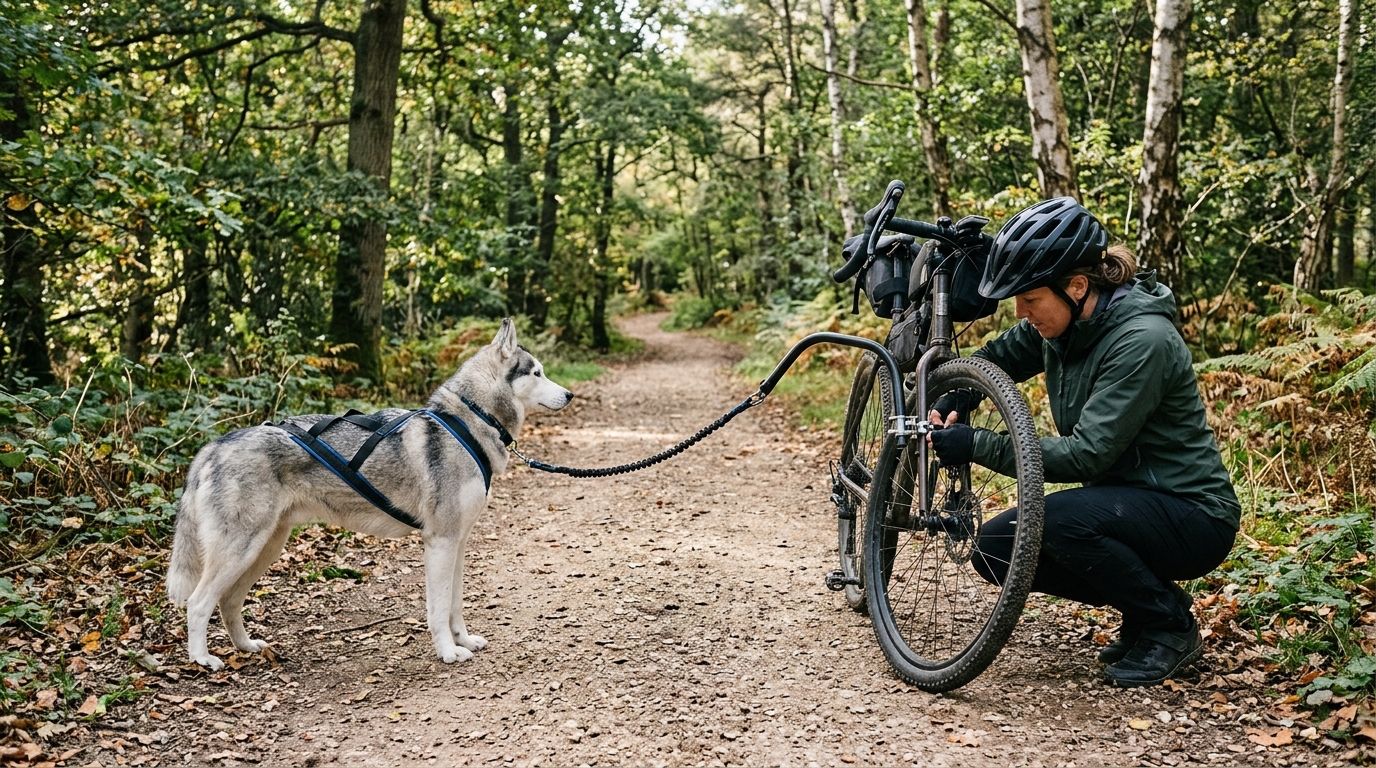
Getting the towline wrapped around your front wheel and skidding to a halt in the mud is the fastest way to ruin a ride. The antenna tangle is the most common reason UK riders bail on bikejoring before their first proper run. Setting up your bike and dog safely comes down to getting three things right: mounting the antenna so it doesn’t snag, choosing a harness that won’t rub, and picking the right line length for the trails you ride.
What is a Bikejoring Antenna and How Should You Mount It?
A bikejoring antenna is a spring-loaded holder that attaches to your bike to keep the towline elevated and away from the front wheel. Its primary job is to stop the line dragging through the mud, snagging on the fork crown, or looping into your spokes when you brake abruptly.
UK‑specific mounting tips Most bike antennas clamp to the head tube or mount under the stem, using the bracket supplied, so the arm points forward and up over the front wheel. Follow the maker’s instructions for your model and check it doesn’t foul your brake cables or headset. A recurring point in owner reviews is that mounting the antenna too low causes the line to drag through the mud and eventually jam the spring – a classic faff that is easily avoided with a higher position.
Adjusting the spring tension The spring should be loose enough to release the line if you crash (the line will pop out rather than jolt the dog) but tight enough that it stays engaged on normal pulls. Set it up at home first: clip the line through, pull it from different angles as the dog would, and check it releases cleanly rather than snagging.
Do This, Not That
- Do mount the antenna at the front (head tube or stem), pointing forward over the wheel and clear of brake cables.
- Don’t run the line from the handlebars or the back of the bike. It will swing into your hands or the front wheel.
Budget note: cheaper antennas do the same basic job. What matters is a secure clamp that fits your bike’s head tube and an arm that holds the line clear of the wheel.
The Harness: Choosing the Right Fit for Pulling
A pulling harness is an entirely different beast from a walking harness. It must sit snug around the chest and shoulders, distribute the pull across the torso, and stay put when the dog accelerates. The wrong fit leads to chafing, reduced pulling efficiency, and in worst cases, the harness sliding off mid‑run. Before starting any pulling sport, The Kennel Club advises ensuring your dog is fully grown and physically fit for the strain.
Fit matters more than colour Deep-chested breeds – Pointers, Huskies, and even larger Labradors – need a harness with a wide chest panel. The Zero DC Faster excels here: its adjustable side straps lock the chest firmly, and the padded shoulder straps keep the pull point stable. Sizing matters, though: a mis-measured chest lets the strap rub under the armpit.
Specialist vs. everyday The Non‑stop Dogwear Freemotion is a specialist pulling harness. Its drawback is the lack of a handle – you can’t easily lift the dog over a log or help them onto a curb. For husky-type dogs, the Neewa Sled Pro X-back harness (roughly £40–£60) is a good-value alternative, though its sizing is fiddly; measure neck and chest against Neewa’s chart.
Common mistake The most common setup error is the “slipping harness”. Owners often forget to tighten the rear strap after the dog’s first sprint. The result is the harness sliding down the spine, causing both chafing and a loss of control. The fix is a quick double‑check of the rear buckle after the initial warm‑up lap.
Don’t be tempted by a walking harness. Cheap no-pull harnesses with a chest clip aren’t made for a dog pulling a bike and can twist the dog’s shoulders at speed. Use a proper pulling harness, which needn’t be expensive.
Should You Use a Bungee or Fixed Towline for Bikejoring?
You should almost always use a bungee towline for bikejoring, as the elastic core absorbs sudden shocks when your dog accelerates or you brake. Fixed lines offer no stretch, transferring every jolt directly to the dog’s shoulders and your handlebars, which makes them suitable only for highly experienced riders on predictable terrain.
Bungee lines – the beginner’s best friend A bungee line contains an elastic core that stretches under sudden acceleration, smoothing out jerks that would otherwise unbalance the rider. Lines with a traffic handle near the dog end are worth having: they let you hold the dog close when passing walkers or horses. A frequent gripe, however, is that the bungee can lose a bit of elasticity after several high‑intensity runs; a simple replacement of the core coil restores performance.
Fixed lines – for the experienced Fixed lines, such as the Zero DC straight leash, are preferred by seasoned riders who want a predictable pull and minimal stretch. They’re lighter, but every shock goes straight through the dog’s harness and your balance.
Length guidelines Bikejoring lines are usually longer than canicross ones, typically around 2.5–3 m stretched, so the dog stays well clear of your front wheel. When riding on public trails managed by bodies like Forestry England, maintaining control is a strict requirement. This length gives enough slack for the dog to swing around obstacles without pulling you off balance, yet keeps the line short enough to maintain control on narrow farm tracks. Shorter lines bring the dog dangerously close to the wheel when it slows; much longer lines are harder to control on bends.
Budget note: simpler, cheaper bike lines without a traffic handle still give you the shock absorption. Just make sure the bike end clips on with a quick-release.
Troubleshooting Common UK Setup Errors
Even with the right gear, a few predictable hiccups can ruin a ride. Here’s a quick checklist of red flags and how to address them on the trail.
- The Tangle – If the line wraps around the front of the bike mid-run, stop, unclip the quick-release and pull the line clear before you set off again. Make sure you can unclip the line from the bike in seconds.
- The Mount – An antenna that keeps falling off usually means the mounting strap isn’t tightened enough. Use a hex key to snug the strap bolts; a loose bolt is the usual cause of repeated drops.
- The Fit – A harness that rubs under the armpit often indicates the side straps are too loose. Re‑measure the dog’s chest (half the girth plus a finger’s width) and re‑adjust the side straps until the harness sits flat against the body.
- The Mud Drag – On wet UK trails, a low‑mounted antenna can pull mud into the spring, freezing the line. Raise the antenna a few centimetres and wipe the spring after each ride to keep it moving freely.
How to Set Up Your Bikejoring Gear for the First Time
1. Mount the antenna Clamp the mounting bracket to your bike’s head tube or under the stem, following the maker’s instructions. Ensure the spring-loaded arm points straight forward and sits high enough to clear your front tyre and any exposed brake cables.
2. Fit the pulling harness Slip the harness over your dog’s head and secure the side straps. Check the fit by sliding two fingers under the chest plate; it should feel snug but not restrictive, and the rear attachment loop should sit at the base of the tail.
3. Attach the towline Thread your bungee towline through the guide ring at the end of the antenna. Clip one end to your dog’s harness and the other to the bike.
4. Secure the quick-release Always attach the bike-end of the towline using a quick-release carabiner or panic snap looped around the bike frame. This allows you to instantly detach the dog from the bike if you crash or get tangled.
Quick Answers
Is a bikejoring antenna the same as a springer?
Yes, an antenna and a springer are the exact same piece of equipment. Both terms refer to the flexible, spring-loaded arm attached to the front of the bike that keeps the towline safely elevated and away from the front wheel.
Can you use a standard walking harness for bikejoring?
No. Standard walking harnesses are designed for gentle tension and will slide up the dog’s neck or chafe their armpits under heavy pulling loads. A dedicated pulling harness is required to safely distribute the weight across the chest and shoulders without restricting their breathing.
What length towline is best for bikejoring?
A 1.5-metre to 2-metre bungee line is the ideal starting length for most UK trails. This provides enough slack for the dog to navigate around puddles and roots, but remains short enough to prevent them crossing into the path of other trail users.
Bikejoring Gear Comparison
| Item | Type | Best For | Approx Price |
|---|---|---|---|
| Antenna | Spring-loaded holder | Keeping line clear of the front wheel | Varies by model |
| Pulling Harness | Load spread across chest and back | Pulling at speed | Roughly £40 - £90 |
| Bungee Towline | Elastic section, about 2.5–3 m | Shock absorption | Varies by brand |
| Fixed Towline | Non-stretch | Experienced riders only | Varies by brand |
Keep Learning
You now have the core pieces of a safe, UK‑ready bikejoring setup: a correctly mounted antenna, a snug pulling harness, and a line that matches your dog’s size and experience level. The real difference between a smooth first run and a tumble on the trail is attention to the little details – tightening that antenna bolt, double‑checking harness straps, and keeping a spare carabiner in your pack.
Ready to put the knowledge into practice? Get the Free Canicross Starter Checklist and make sure your dog’s rest and recovery match the effort you’ll be putting them through on the trails. With the right gear and a solid setup, bikejoring can become a regular adventure rather than a one‑off experiment. Happy riding, and may your lines stay clear and your trails stay mud‑free.
Related Guides
For a complete overview, see our What Is Bikejoring? A UK Beginner’s Guide.
Further Reading
Note: General guidance only, verify details with a qualified professional or official source.